[ad#250]
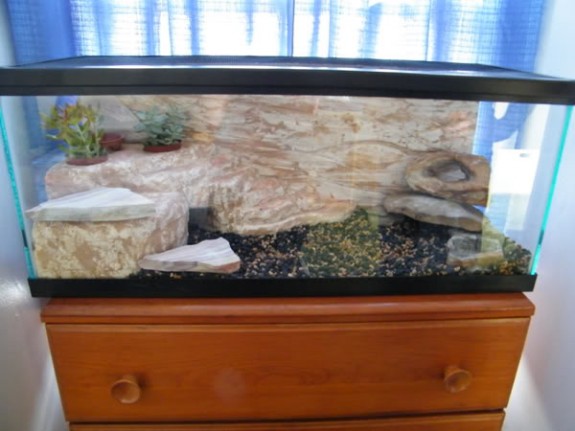
Over the past summer I decided that I wanted to design a better enclosure for my leopard gecko, Yoshi. I’ve always focused on providing the most natural terrarium that I could. Aside from making the tank more eye appealing, I hope that it lessens the stress on the animal by making it feel more at home. My main inspiration for the tank was those Exo-terra and Zoo-Med tanks that have the foam backgrounds and look natural and realistic. I spent a while researching what the natural habitat was for leopard geckos and I decided that I would try to make my habitat resemble the sandstone mountainous region of Pakistan.
Supplies Needed:
- 1” thick pink insulating foam
- Liquid Nails for Projects
- Non-toxic latex paint
- Sandpaper, metal file, power sander
- Jigsaw, or large utility knife
- Sharpie marker
- Tape measure
I picked up all these supplies at Home Depot and had some of the stuff just lying around my house. The total cost for this project for me was about $25.
Step One – Cutting
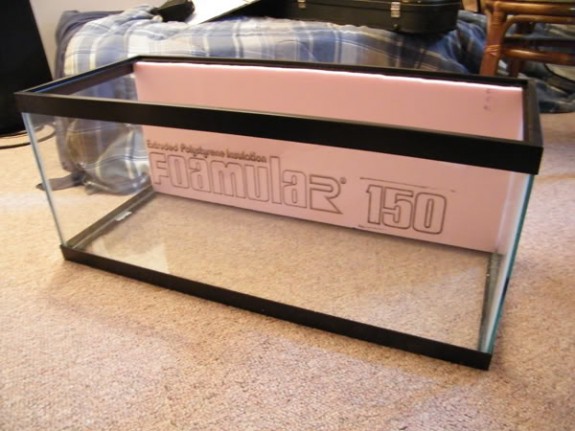
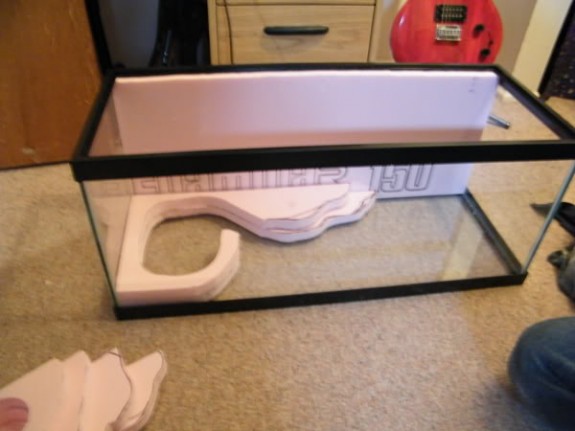
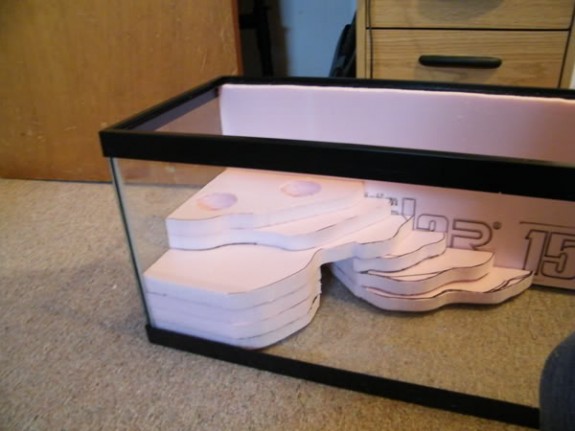
Measure the inside of the aquarium or tank that you are going to use. I used a twenty-gallon aquarium because it allowed me quite a bit of room to work. The main thing to remember is that you should make 100% sure your measurements are spot-on the first time so that you don’t end up not having enough room in your tank later. I decided to make a foam background as well as a foam cave that would slide down in front of the background and add a 3rd dimension to my tank. I decided that layering up the foam like a layer cake would probably be the easiest way to make a hollowed out cave area. As you can see by the pictures, I drew out each layer that I wanted to make and made sure they would all fit on top of each other nicely. I cut out the layers with my jigsaw although you could probably use a large utility knife.
Step Two – Gluing
Once I was sure that all the pieces would fit on top of each other and fit down in the tank I glued them together with the Liquid Nails for Projects. It’s kind of sticky stuff to work with but it holds very tight and doesn’t eat the foam away. Once all the layers were glued on top of each other I left them overnight with some weights on top to make sure I got a nice hard seal on the foam layers.
Step Three – Shaving and Carving
After the glue is done drying is when the fun part comes! But a quick word of warning; this creates a huge mess so either do it outside, or have a good vacuum ready! I had the best luck with a couple different types of metal files and sand paper. I didn’t want the foam to look like a giant pink cake so I started carving down the layers to make them a bit more natural and weathered looking. I used larger toothed files for removing large sections of foam and very fine-toothed files and sand paper for making it look smooth and adding that sandstone look to the foam. This is the part where you really just need to be creative and make it look how you want it to look. I tried to make all the hard edges a bit more rounded and tried to gouge some deep grooves into the foam to simulate fissures in the rock.
Step Four – Painting
After I cleaned up all the pink foam that had covered most of my house, I was ready to paint. I chose two different earth tones for paint, just a dark brown and a light brown but depending on what type of habitat you’re doing the color is up to you. I covered everything in a base coat of the darker brown paint and then let it dry. The main purpose of the darker paint was to just cover the pink and provide a nice base for the rest of my painting. After that coat dried I added some of the lighter paint until I was satisfied. Again, this is a part where it’s really up to you how it looks depending on what your goals for the project are. Once everything was painted and dried I left it outside for 3 days to dry completely and air out to get all the paint fumes out.
Step Five – Finish!
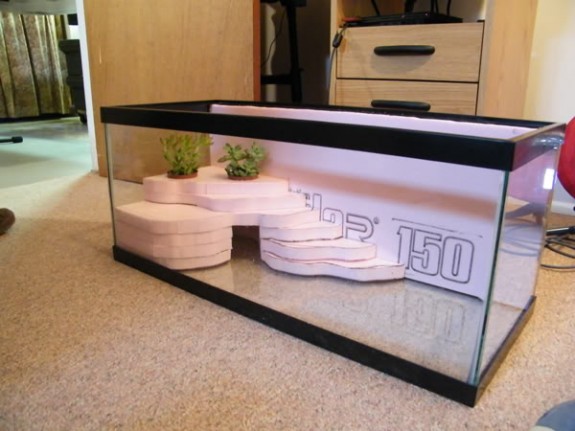
Once it was completely dry, I fit it into my aquarium, put in my substrate, and added my decorations and some big flat rocks. I also decided to add some small potted plants of the succulent variety to the top of my cave area, which have since been taken out because they got too big.
I’ve had my leopard gecko in that set up for about 6 months and so far everything has gone perfectly fine. The only problem with this set up is that it is somewhat hard to pick up the cave to be able to clean underneath, but so far it hasn’t been a real big issue. My gecko really likes to be able to get to the top of the cave and get closer to my heat lamp. She also has been occasionally spotted acting like a crested gecko and clinging to the back wall with her claws.
[ad#sponsor]


Great work 🙂 !
Hi Jesse,
Great article. We have been working on similar techniques for making fake rock for garden features and to cover garden taps with fake boulders. We have used many other techniques using mortar on chicken wire and cardboard boxes. We’ll have to experiment with expanded polystyrene foam as you have done.
Thanks for the tip.
Stan Alderson
Hi there, i am interesting in making something like this. But, i am concerned about the non-toxic latex paint. When did you buy it at?
I don’t know if your in the states or Canada. I live in Ontario canada
can u tell me what type of paint u used.
by the way great design and fabulous set-up keep it up.
Looks damn good, I just recently acquired a leoprad gecko from a friend of mine and and have been looking online for some ideas and came across your set up. Its one of the best ideas ive seen. Im gonna start on my tank in the next few day and am gonna go with this idea, talk about custom. Thanks for the post!! Again great idea.
Looks awesome. What type of substrate do you use? And how big is the tank? I live in Canada to by the way 🙂
I used to have small aquarium gravel in there, but I have since switched to sand. The tank is 20 gallons which would be 75.7082 liters. I’m not sure how they measure the tanks in different countries!
Also, just a followup: I’ve had my gecko in this tank setup for well over TWO years and so far everything has gone perfectly. Also, thanks for everyone who has read and commented on this post!
Great tank setup. I am going to be acquiring my own leopard gecko very soon and I wish I would have found this before i bought stuff for the tank – I might end up doing this still, because its so awesome and looks so authentic and 500 times better than any of the stuff you can put in a tank that you buy from the store or internet.
You should really try and turn your DIY project you’ve done here into a business you could go far with things like that and people would certainly pay to buy it.
Great DYI info! I tried gluing flat rocks together & such to make a more natural setting for my girls (leos). I never felt it was stable enough to leave in there even though Bandit loved climbing them. I redid the tank floor recently with stone look ceramic tile which they love. They never liked natural bedding or tiny pebble substrate. Thank you so much for the info! This will be my next project for them.
That’s a 20 gallon tank I use 30 for my gecko and I put real rock and also and all natural reptie sand and he love digging thanks I made my own one of those!
This greatly inspired me to create my own! I do, however, urge you to please find a non-sand substrate for your reptile, even if it is slate tiles or a repti-carpet, it isn’t worth your gecko ingesting sand and getting a full digestive impaction.
How do you secure the inserts in the terrarium?
Hey I’m looking for something to help my bearded dragon because he is always bored and this is perfect because it will give him more space to clime but what I’m worried about is the foam board melting and it hurting the lizard.Also if you have anymore tricks to a entertain a bearded dragon please let me know.
I’m not sure if the original author will see this and respond. If not, try some reptile forums and post in the DIY section. As far as I know, these builds are quite stable and will not melt. I have 2 beardies. I let them out to run around the living room and dining room every morning before I go to work and that seems to help. In the summer, I take them out with me when I garden. I have a harness for each of them,not so much because I’m going to “walk” them, but in order to keep track of where they are, since the “leash” is brightly colored and about 6 feet long.
I’m currently working on a custom background for a 120 gallon aquarium. I am using a grout to cover the polystyrene foam, then paint, then sealant. I am on my 2nd coat of grout, it really seems to strengthen the background too. I think this would eliminate chance of melting foam. The grout product I am using is called foam coat. Still unsure of type of paint to use?
It would be cool if u made the top 2 layers of the hide removable. This would allow easy access for cleaning and handling your leo