The S.I.M. incubation container started out as being a homemade “no-substrate” container. John Adragna and I have been keeping and breeding reptiles for well over 20 years and incubated eggs like most have over the years. Although the traditional methods of incubation have always served us well in the past, we wanted a better, more reliable method of incubation, one that would be quick and easy to set up without worrying too much about measuring water to substrate ratios, and that would yield equal to, or better results.
[ad#sponsor]
Design Concepts
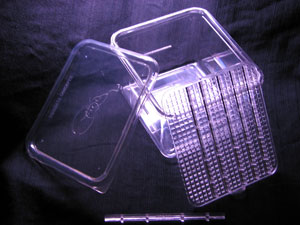
After months of research, we came to the conclusion that the no-substrate method might be a step in the direction we wanted to go. We saw that some python breeders were using the method with outstanding results so we figured if it works with python eggs, in theory, it should work for other reptile eggs as well.
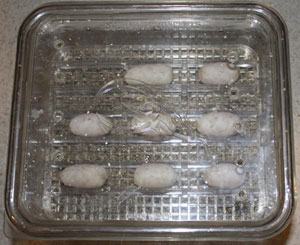
At the time we were working mostly with various Varanids and a few gecko species. Many of the females in the collection were either ovulating or gravid so we decided to start designing the containers. We wanted to use the no-substrate method but we were unhappy with the current way it was done. Most of the home made containers we have seen were utilizing a light diffuser or egg crate sitting on top of an incubation substrate. We thought this idea was great but it needed some redesigning.
We went to the drawing board to figure out how to fix a few aspects we were not crazy about. For starters we wanted to come up with an idea about how to keep the eggs securely in place. We did not want to worry about eggs rolling or being moved by hatchlings. If reptilian eggs are rolled during incubation it can kill the developing embryo in the egg. We did not feel comfortable with just placing the egg on the light diffuser. After many prototype egg stabilizer ideas, we finally came up with our triangular rods to keep the eggs in place.
We were also not happy with the size of the holes in standard light diffuser grids because hatchlings would still be able to get to the substrate below, and even worse, if we wanted to use just water at the bottom, small hatchlings could slip through the grid and possibly drown.
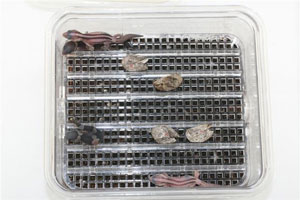
We made all of the modifications to the current no substrate method and put the containers to work. We did not measure any substrate to water ratios. We simply added water and drained the substrate. We ran the containers for a couple of weeks prior to adding any eggs to be sure the containers would create the proper environment for most reptile eggs. When we were comfortable with the results we decided to add eggs to the containers.
Testing and fabricating
At this time we also wanted to see how the no-substrate method stacked up against the traditional way of incubating eggs in a damp substrate. We did many side by side tests and found that the eggs being incubated in the prototype S.I.M. containers were hatching earlier than expected, the hatchlings that were emerging were very robust and the yolk sacs of every hatchling were fully absorbed.
After have such incredible results, we then decided it would be great to produce a new reptile product, one that was designed for the sole purpose of incubating reptile eggs. We put our heads together and redesigned our home-made containers from the ground up. We did tons of research on reptile egg incubation. We weeded through hundreds of pages of literature on reptile egg incubation.
John started to draw up some of the designs we drew on paper in Adobe Illustrator. Luckily for us, John uses the program on a daily basis because of his 9 to 5 job. He was able to draw up our final design ready to be brought to the factory to have our molds cut.
Protecting and Producing our Product
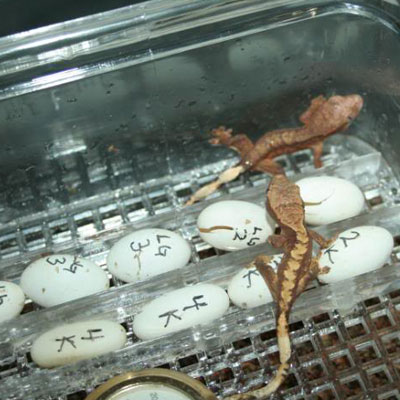
One thing needed to be sorted out first before we were to go into production: We needed to protect our product. John and myself made an appointment to see a patent lawyer. When we went to see the lawyer he advised us to have a professional manual patent search done because on-line searches leave many stones unturned. After two weeks of manually searching the patent archives in Washington DC, our lawyer came back with the results. Many patents came up that involved bird incubation techniques. Many were mechanical incubators and trays. Nothing was uncovered that involved reptile incubation and there has never been a no-substrate incubation container designed to incubate any species of animal. So our lawyer then advised us to go ahead with a utility patent application. The utility patent is a more expensive, harder to obtain patent. It is well worth the effort. With a utility patent, no one can copy or produce this concept to sell.
Now that we had gotten all of the legal junk out of the way, it was time to present our design to our factory and have our molds cut. Before the final molds were cut, the factory made a resin model for us to look at and to make any necessary changes. After the resin model was tweaked a bit, the final injection molds were cut and our product went into production. At this point we had to decide what type of plastic we were going to use for the container. We wanted to make the container clear from top to bottom so that eggs can be viewed at all times without having to open the container. We went with a clear polycarbonate body and a clear TPU plastic lid. We used these two plastics because of their clarity and durability.
We got our first finished factory made containers and put them to work fast. We needed to test them before we offered them to the public. We had to be confident they worked to be sure we were offering a quality product that John and I would be able to stand by. We personally tested some and we also had some of the larger breeders test them for us. Some tested with clutches of eggs and others tested with hygrometers and thermometers at the level where the eggs would be sitting. Others did a combination of both. Once we were confident enough about our final product, it was time to introduce it to the public. Now all we needed was a name for the product. John and myself both agreed on the S.I.M. container. S.I.M. stands for Suspension Incubation Method. We figured it was catchy and self explanatory.
S.I.M. Meets the Public
Where do we introduce the product first? I could not think of a better place to introduce our product than Geckoforums.net. That has been my internet home forum for many years and I have made some very good, personal friends there so I wanted the members and my friends to see it first. I waited a couple of days before I posted it on other forums. Then we were thinking, where do we release it for public sale? What better place than the National Breeders’ Expo in Daytona Florida? The Daytona show was our first show with the product. We have gone on to do many other shows since. So far it has been a really fun ride. We love doing shows to sell reptiles but since the launch of our product it has been even more fun because now we are offering a quality reptile product that works well. We have gotten tons of great feedback and we are so happy that our product has brought some peace of mind to those who are in their first breeding season and that we are able to provide a more professional incubation tool to experienced breeders.
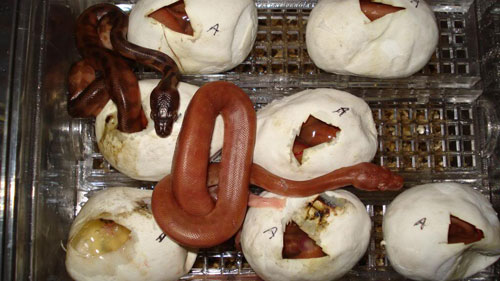
With all of the great success with this product, there was one minor glitch. As some of you know, the S.I.M. had some issues when being used in the Hovabator incubator and other top heated incubators. With the help of our awesome customers and good friends in the hobby, we were able to come up with a solution for the issue. The solution works great and the S.I.M. container can be used by anyone in any incubator.
When I was asked to write this article, I was asked to write about what it takes to come up with a product and have it produced. In short, you need to have a vision. You have got to be 100% confident in what you want to produce. Make sure your product works. If it is a new idea, I highly suggest you see a patent lawyer to make sure your product is protected. If the product needs to be mass produced you should contact the right factories for your specific needs. Shop around because production prices do vary quite a bit. It is not needed but I do recommend starting up a small legitimate business like an LLC. You will need start up funds. How much depends on what you are producing. Everything from the material used for your product to shipping has a price tag and some of those prices can be very high. Most of all you need to have fun doing it. There will be some snags along the way and it can be a huge gamble, so it is important that you believe in your product and love what you do.
[ad#superworm]


Great article, Gregg! I may have to test these out myself next season!
Thanks for sharing this story with us, Gregg! Neat product indeed.
Greg,
Instead of just water in the S.I.M container is it possible to use water crystals?
I’m sure Gregg will ultimately answer this himself, but I did try the SIM with water crystals and was surprised to find that I did not get the required condensation on the sides. I’m back to perlite with 2-3 cups of water and that’s working fine.
Sim container are the real deal.. i have some my self and the build quality is amazing .. John definitely help a lot of breeders with those containers
hello two questions which substrate to use?
where to find in Brazil? vove sends?