Objective:
To create a modular canyon-styled environment incorporating background, sides, a cool hide, a warm hide and various climbing structures.
[ad#sponsor]
Supplies List
- 3/4″ foam (polystyrene) insulation
- Liquid Nails
- Unsanded grout
- Cement color
- Modge Podge all-purpose clear sealant
- Acrylic paint
- Zoo Med Repti-Sand Natural Red
- Various flora of different types and sizes (Desert themed)
- 2 or 3 mixed size paint brushes
- 1 fine grit sandpaper block
- 1 knife (any old small one will do)
- 1 pen-style soldering gun or polystyrene hot wire cutter
- 1 ShopVac (needed to suck up the itty bitty polystyrene pieces)
STEP 1
Measure the size of the area to be covered by the background/sides/bottom of the structure. My unit is 24″ wide and 18″ high. Due to the large size of this background I’ll be constructing it as a left, and a right module.
STEP 2
Cut the polystyrene into appropriate sizes based on the measurements taken in STEP 1. I cut two 12″x18″ pieces for the background panels and two 6″x18″ pieces for the side panels.
STEP 3
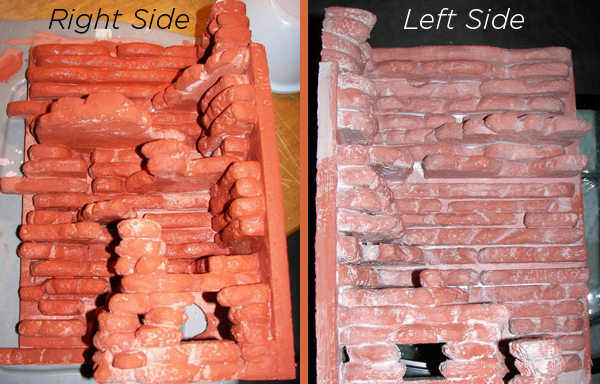
Using Liquid Nails adhere the side panels to the background panels. The photos below were taken after applying the first layer of grout, however, you can easily see how the side panels are attached to each of the background panels.

STEP 4
While waiting for the liquid nails to set, start shaping the smaller pieces of rock/boulder to create the staggered rock look. When attempting to simulate the curved and rounded shape of the rock it is much easier to cut out the basic shape using a soldering iron or polystyrene hot wire cutter.
This is a photo of a small piece of polystyrene after cutting, shaping, and sanding.
STEP 5
Now it’s time to adhere the pieces of rock to the background and side pieces starting from the top of the structure down. Individual pieces are placed level in a horizontal fashion from left to right. While placing the various pieces I decided to add some larger shelf-like pieces to simulate overhangs and larger rocks which will also serve as a place for my Gecko to rest/bask while exploring the structure.
Here are a few close-ups of the structure including “shelves”, hides, etc.
STEP 6
While the majority of the structure dries, I begin to work on the hides. Each hide will reside in the bottom of the corner of each of the two halves of the structure. The cool hide has a floor panel created from the polystyrene. The warm hide has no floor as the UTH (Under Tank Heater) will be beneath it. Each hide is constructed by using small pieces of polystyrene panel shaped and sanded to look like fallen stones/boulders. Corners of the structure are created by stacking small pieces of stone while sides are done using the same concept but with rectangular pieces. By stacking one or two of the rectangular pieces followed by 2 of the smaller pieces followed by 1 or 2 more rectangular pieces one can easily create a natural looking window through which you can easily view your reptile.
Here are photos of each hide. The first is the cool hide, and the second is the warm hide.
STEP 7
At this point the essentially complete structure is ready to dry before starting to grout. In an effort to conceal the majority of the “seam” down the middle of the background piece I adhered several pieces of the smaller stones in a way where they slightly overlapped from the left to the right or from the right to the left.
STEP 8
Now that the entire structure has had time to dry, it’s time to apply the first layer of grout. The first layer contains a half teaspoon or so of cement color and is mixed so that its consistency is that of runny pancake mix. Using a large brush slop on the grout while wiping the brush against the edges of the rocks allowing the grout to run down in between all the pieces. When finished applying the first coat of grout, allow the entire structure to dry for a full 24 hours.
STEP 9
After the first layer of grout has dried completely, mix the second coat. This batch of grout should be a little thicker than the first. Instead of runny pancake mix I suggest standard pancake mix as the consistency. Once mixed well, begin slapping it on. Again, allow the grout to fully dry and harden for at least 24 hours before proceeding.
Here’s a photo of the right-side module after applying grout layer #2.
STEP 10
Now it’s time for the 3rd layer of grout. As stated previously, this coat should be thicker than the last and should be applied using a slightly smaller brush. Here are a few pictures taken after the 3rd coat was applied and allowed to dry.
STEP 11
Now it’s on to painting. I generally apply 3 coats of acrylic paint. The first coat consists of darker colors while the 2nd and 3rd coats contain lighter, more vibrant colors. For this build I used burnt umber as a base and applied terra cotta and canyon red as top coats to bring out the red-rock style I sought. Once the paint has dried slightly I recommend using a dry brush with a pulling motion to create lines and striations similar to those found in real rock. The photos below illustrate the final painted surface.
STEP 12
Once the paint has had time to dry it’s on to the sealer. The first coat was applied with a spray bottle. When mixing the sealer I usually keep the ratio around 1 part water, 2 parts sealer. I prefer mine a little thicker at first and usually end up thinning the mixture a little when applying later coats. After spraying on the first layer of sealer I use a small sponge-brush to smooth out the leftover pools of sealant. After the first layer was dry I applied the second coat of sealer. This time I sprinkled the structure with some of the red sand I’ll be using as substrate. I especially tried to get some of the sand into the horizontal lines between the pieces of faux rock to help ease the transition from one stone to the next. Once the 2nd coat dried I applied the 3rd. I added more sand to this coat and allowed it to dry once more before applying the fourth and final coat of sealer.
At this point you’ll want to allow the structure to air dry for 6 or 7 days. Collect your flora and any other items you wish to place in your enclosure and ready them. The photos below illustrate the look of the final structure after being allowed to dry for a week.
STEP 13
Step 13 essentially consists of putting everything in the tank together. Attach the UTH to the underside of your enclosure. Add substrate, water and food bowls, and anything else you desire. Set your temps as required and allow the enclosure to “cook” for at least 48 hours. During this time monitor temps and humidity for consistency and adjust as needed. Once you’re satisfied with state of the environment inside the vivarium, introduce your reptile, sit back, and enjoy your hard work!
Sources
- Fake Rock Man @ Lizard-Landscapes
- Becky Wheeler @ RFUK
- bwoodfield @ GeckosUnlimited
- fallenangelfyre @ GeckosUnlimited
[ad#300]


Fascinating!!!! Awesome article. I enjoy following Neo’s Blog and would love to meet him personally some day. I’m not normally a fan of the cold blooded, but I am a great fan of your literary works over many, many years. BTW: Paco was your 25th birthday gift from your mother. 🙂
Keep up the good work. I’m sure all the lizzard fans out there appreciate your contributions!
Definitely one of the best how to presentations i have ever seen
Hello, I have had an African Fat-Tailed Gecko now for about 6 years. I have him in a 20 gallon terrarium. I was wondering if you knew of any other lizard species that would be compatible with him in this enclosure. Thanks
Especially with a tank that size, it’s really best not to mix species.
Aliza